
We are going to create a stack where:
- Microservices are communicating using gRPC using protobuf for serializing-deserializing
- Frontend is consuming APIs through graphQL
- React is used to render UI
Step 1: gRPC Service
You need a gRPC server running for the tutorial. If you don’t have one of your own, you can use the one here. This will run a basic gRPC server at 8089 port.
We will cover how to make your own gRPC server in some other tutorial.
Step 2: GraphQL Server
Now, we need to consume the gRPC service to expose the methods through the graphQL. We have used rejoiner.io for the purpose. For the purpose of this tutorial, you can use the graphQL server provided here.
Step 3: React UI
- Install yarn. Yarn is a dependency management system. We are going to use yarn for our project
brew install yarn2. Install react-relay
yarn add react react-dom react-relay3. Install relay-config
yarn add --dev relay-config4. Install babel-plugin-relay
yarn add --dev babel-plugin-relay graphql5. Install relay-compiler
yarn add --dev relay-compiler6. Install tailwind for css purpose
npm install tailwindcss7. Create a react application using yarn
yarn create react-app relay-exampleHere relay-example is the name of my project. You can have any name of your choice.
8. Now you can see a folder called relay-example. Change directory to relay-example
cd relay-example9. Make a file with the name relay.config.js and paste following code in the file:
| module.exports = { | |
| // … | |
| // Configuration options accepted by the `relay-compiler` command-line tool and `babel-plugin-relay`. | |
| src: "./src", | |
| schema: "./data/schema.graphql", | |
| exclude: ["**/node_modules/**", "**/__mocks__/**", "**/__generated__/**"], | |
| } |
10. Make a file called “.babelrc”. Add the following code in the file
{
  "plugins": [
    "relay"
  ]
}
11. Paste the following detail in package.json
| { | |
| "name": "relay-example", | |
| "version": "0.1.0", | |
| "private": true, | |
| "dependencies": { | |
| "@testing-library/jest-dom": "^4.2.4", | |
| "@testing-library/react": "^9.3.2", | |
| "@testing-library/user-event": "^7.1.2", | |
| "react": "^16.13.1", | |
| "react-dom": "^16.13.1", | |
| "react-relay": "^10.0.1", | |
| "react-scripts": "3.4.1", | |
| "tailwindcss": "^1.6.2" | |
| }, | |
| "scripts": { | |
| "build:tailwind": "tailwindcss build src/tailwind.css -o src/tailwind.output.css", | |
| "prestart": "npm run build:tailwind", | |
| "prebuild": "npm run build:tailwind", | |
| "relay": "relay-compiler –src ./src –schema ./schema.graphql –extensions js jsx", | |
| "start": "react-scripts start", | |
| "build": "react-scripts build", | |
| "test": "react-scripts test", | |
| "eject": "react-scripts eject" | |
| }, | |
| "eslintConfig": { | |
| "extends": "react-app" | |
| }, | |
| "browserslist": { | |
| "production": [ | |
| ">0.2%", | |
| "not dead", | |
| "not op_mini all" | |
| ], | |
| "development": [ | |
| "last 1 chrome version", | |
| "last 1 firefox version", | |
| "last 1 safari version" | |
| ] | |
| }, | |
| "devDependencies": { | |
| "babel-plugin-relay": "^10.0.1", | |
| "graphql": "^15.3.0", | |
| "relay-compiler": "^10.0.1", | |
| "relay-config": "^10.0.1" | |
| } | |
| } |
11. Relay Environment
Make a file called RelayEnvironment.js in src folder and paste the following detail
| import { | |
| Environment, | |
| Network, | |
| RecordSource, | |
| Store, | |
| } from 'relay-runtime'; | |
| function fetchQuery( | |
| operation, | |
| variables, | |
| ) { | |
| return fetch('http://localhost:8080/graphql', { | |
| method: 'POST', | |
| headers: { | |
| 'Content-Type': 'application/json', | |
| }, | |
| body: JSON.stringify({ | |
| query: operation.text, | |
| variables, | |
| }), | |
| }).then(response => { | |
| return response.json(); | |
| }); | |
| } | |
| const environment = new Environment({ | |
| network: Network.create(fetchQuery), | |
| store: new Store(new RecordSource()), | |
| }); | |
| export default environment; |
12. Get your graphQL schema file. Do this in home folder(i.e. in relay-example)
npm install -g get-graphql-schema
get-graphql-schema http://localhost:8080/graphql > schema.graphql
13. App.js
| import React from 'react'; | |
| import { QueryRenderer } from 'react-relay'; | |
| import environment from './RelayEnvironment' | |
| import graphql from 'babel-plugin-relay/macro'; | |
| import './tailwind.output.css'; | |
| export default class App extends React.Component { | |
| //this.state = {farmCropId:1} | |
| constructor(props) { | |
| super(props) | |
| this.state = { farmCropId: 1 } | |
| } | |
| onFarmCropIdChange = (event) => { | |
| console.log(event.target.value) | |
| this.setState({ farmCropId: event.target.value }) | |
| } | |
| render() { | |
| const farmCropId = this.state.farmCropId | |
| console.log('Props', this.props) | |
| return ( | |
| <div> | |
| <div className="max-w-md mx-auto flex p-6 bg-gray-100 mt-10 rounded-lg shadow-xl"> | |
| <label class="block text-gray-700 text-sm font-bold mb-2" for="farmCropId"> | |
| Farm Crop Id | |
| </label> | |
| <input class="shadow appearance-none border rounded w-full py-2 px-3 text-gray-700 leading-tight focus:outline-none focus:shadow-outline" type="text" value={farmCropId} onChange={this.onFarmCropIdChange} /> | |
| </div> | |
| <QueryRenderer | |
| environment={environment} | |
| query={graphql` | |
| query AppQuery($farmCropId: Int) { | |
| bookings(input: {farmCropId: $farmCropId}){ | |
| bookings { | |
| bookingId | |
| machines{ | |
| location | |
| } | |
| } | |
| } | |
| } | |
| `} | |
| variables={{ farmCropId }} | |
| render={({ error, props }) => { | |
| console.log('Error', error, 'Props', props) | |
| if (error) { | |
| return <div>Error!</div>; | |
| } | |
| if (!props) { | |
| return <div>Loading…</div>; | |
| } | |
| return <div className="max-w-md mx-auto flex p-6 bg-gray-100 mt-10 rounded-lg shadow-xl"> | |
| <div className="ml-6 pt-1"> | |
| <h1 className="text-2xl text-blue-700 leading-tight"> | |
| Booking Information: | |
| </h1> | |
| {props.bookings.bookings.map((booking) => { | |
| return ( | |
| <div className="max-w-md mx-auto flex p-6 bg-gray-100 mt-10 rounded-lg shadow-xl" key={`booking-${booking.bookingId}`}> | |
| <label>Booking Id: {booking.bookingId}</label> | |
| <br /> | |
| <label>Machine Location Id: {booking.machines.location}</label> | |
| </div> | |
| ) | |
| })} | |
| </div> | |
| </div>; | |
| }} | |
| /> | |
| </div> | |
| ); | |
| } | |
| } | |
14. Let’s run relay
yarn relayThis will generate some code in _generated_ folder in src.
15. Run the project
yarn startStep 4: Deployment With nginx
- Install nginx using this link
- yarn build in the home folder of the project
- Find you nginx configuration file at /usr/local/etc/nginx/nginx.conf and change location inside server block as follow:
location / {
            root   {absolute path in your computer}/relay-example/build;
            index  index.html index.htm;
        }
For referece, my nginx.conf file looks like this:
| #user nobody; | |
| worker_processes 1; | |
| #error_log logs/error.log; | |
| #error_log logs/error.log notice; | |
| #error_log logs/error.log info; | |
| #pid logs/nginx.pid; | |
| events { | |
| worker_connections 1024; | |
| } | |
| http { | |
| include mime.types; | |
| default_type application/octet-stream; | |
| #log_format main '$remote_addr – $remote_user [$time_local] "$request" ' | |
| # '$status $body_bytes_sent "$http_referer" ' | |
| # '"$http_user_agent" "$http_x_forwarded_for"'; | |
| #access_log logs/access.log main; | |
| sendfile on; | |
| #tcp_nopush on; | |
| #keepalive_timeout 0; | |
| keepalive_timeout 65; | |
| #gzip on; | |
| server { | |
| listen 7000; | |
| server_name localhost; | |
| #charset koi8-r; | |
| #access_log logs/host.access.log main; | |
| location / { | |
| root /Users/harshvardhan/IdeaProjects/react-learning/relay-example/build; | |
| index index.html index.htm; | |
| } | |
| #error_page 404 /404.html; | |
| # redirect server error pages to the static page /50x.html | |
| # | |
| error_page 500 502 503 504 /50x.html; | |
| location = /50x.html { | |
| root html; | |
| } | |
| # proxy the PHP scripts to Apache listening on 127.0.0.1:80 | |
| # | |
| #location ~ \.php$ { | |
| # proxy_pass http://127.0.0.1; | |
| #} | |
| # pass the PHP scripts to FastCGI server listening on 127.0.0.1:9000 | |
| # | |
| #location ~ \.php$ { | |
| # root html; | |
| # fastcgi_pass 127.0.0.1:9000; | |
| # fastcgi_index index.php; | |
| # fastcgi_param SCRIPT_FILENAME /scripts$fastcgi_script_name; | |
| # include fastcgi_params; | |
| #} | |
| # deny access to .htaccess files, if Apache's document root | |
| # concurs with nginx's one | |
| # | |
| #location ~ /\.ht { | |
| # deny all; | |
| #} | |
| } | |
| # another virtual host using mix of IP-, name-, and port-based configuration | |
| # | |
| #server { | |
| # listen 8000; | |
| # listen somename:8080; | |
| # server_name somename alias another.alias; | |
| # location / { | |
| # root html; | |
| # index index.html index.htm; | |
| # } | |
| #} | |
| # HTTPS server | |
| # | |
| #server { | |
| # listen 443 ssl; | |
| # server_name localhost; | |
| # ssl_certificate cert.pem; | |
| # ssl_certificate_key cert.key; | |
| # ssl_session_cache shared:SSL:1m; | |
| # ssl_session_timeout 5m; | |
| # ssl_ciphers HIGH:!aNULL:!MD5; | |
| # ssl_prefer_server_ciphers on; | |
| # location / { | |
| # root html; | |
| # index index.html index.htm; | |
| # } | |
| #} | |
| include servers/*; | |
| } |
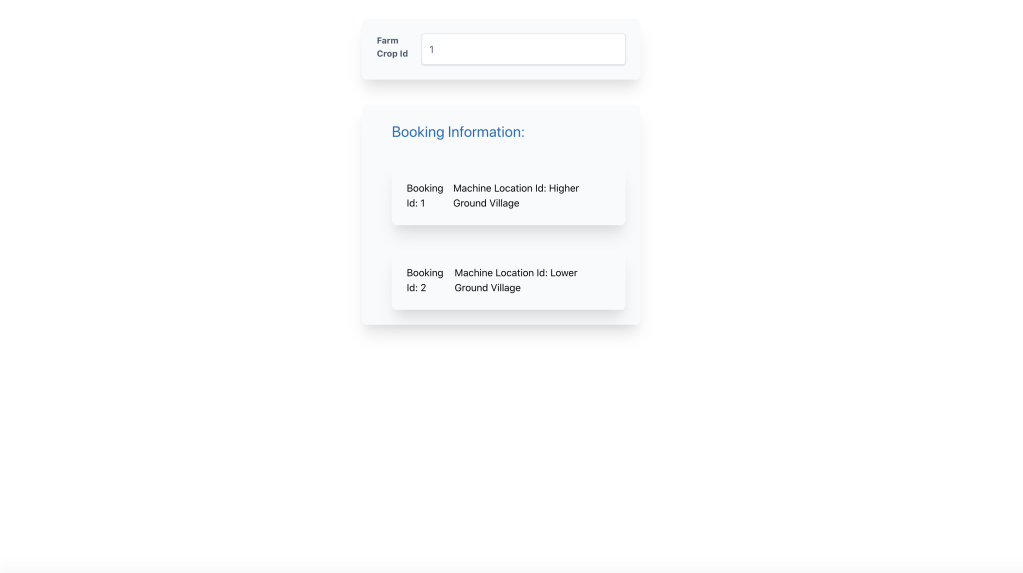
After you run successfully, you should have following screen:
Github Repo
References:
https://relay.dev/docs/en/quick-start-guide
https://relay.dev/docs/en/experimental/step-by-step
If you liked this article and would like one such blog to land in your inbox every week, consider subscribing to our newsletter: https://skillcaptain.substack.com

Leave a Reply